Carbing the 20 valve

Strictly 20valve engine related topics.

Moderators: dr.occa, CBR_TOY

dr.occa
Hades - Site Admin
Posts: 7733
Joined: Tue Sep 04, 2007 1:49 pm
Location: On my hiney...in HOU
Contact:

Carbing the 20 valve

Post by dr.occa »

For starters, you'll need an intake manifold for your Silvertop/Blacktop 20 valve 4AGE.

The ideal one I would have to say is a single cast piece by Rowland Manifolds out of Cape Town, South Africa.

I spoke with Rowland Stanton and after a few questions placed an order for the M012...and in 12 days exactly, X-mas (I love Christmas) arrived and in the Texas heat of all days.

For your perusal:
20v-carb-project_01.jpg
20v-carb-project_01.jpg (69.58 KiB) Viewed 336 times
20v-carb-project_02.jpg
20v-carb-project_02.jpg (55.86 KiB) Viewed 336 times
Great offset to keep the carburetors parallel due to the 20v head having a slight slope on the intake mating side.
20v-carb-project_03.jpg
20v-carb-project_03.jpg (56.78 KiB) Viewed 336 times
20v-carb-project_04.jpg
20v-carb-project_04.jpg (46.94 KiB) Viewed 336 times
Both the carb and the head mating surfaces are very clean. No slop.
20v-carb-project_05.jpg
20v-carb-project_05.jpg (60.06 KiB) Viewed 336 times
Rowland was kind enough to include a 5/16 barbed fitting and hex set screw.

Quick note: though it came with the above aforementioned hardware it did not include the mounting studs for the carbs which are 8mmx1.25. Pick some up at your local hardware store in the specialty drawers.
20v-carb-project_06.jpg
20v-carb-project_06.jpg (57.63 KiB) Viewed 336 times
The left 3 mounting bolts on the under side of the manifold had some slight clearance issues only because the engine I have used flanged head bolts. I just swapped them out with comparable ones without the flanged head and slipped some lock washers under them.
20v-carb-project_07.jpg
20v-carb-project_07.jpg (50.8 KiB) Viewed 336 times
Difference between the mounting bolts I mentioned above. This may not be an issue for others but in the off-hand chance that someone might accuse me of not being thorough (it can still happen) I thought I'd cover that detail.
20v-carb-project_08.jpg
20v-carb-project_08.jpg (67.96 KiB) Viewed 336 times
With a stripped Mikuni 44PHH carb I confirmed that the stud holes were drilled straight and I didn't have to fight or force the carburetor on 1 & 2...
20v-carb-project_09.jpg
20v-carb-project_09.jpg (66.77 KiB) Viewed 336 times
...or on 3 & 4.

Of course the carburetors will not be mated all the way to the flange as either phenolic spacers or soft mounts are usually employed. This just illustrates how the Rowland manifold is designed with detail in mind and important details at that.
20v-carb-project_10.jpg
20v-carb-project_10.jpg (33.53 KiB) Viewed 336 times
This is a shot down the manifold to the head. Very little (if any) blockage/protrusion is visible on the part of the head that would impede disturb flow. This is consistent on all 4 runners.
20v-carb-project_11.jpg
20v-carb-project_11.jpg (45.41 KiB) Viewed 336 times
This is a view from the carburetor side to the manifold. Again, very little to no (really the latter) obstruction from the manifold to disturb air/fuel flow. Again, this is consistent on all 4 ports.

Rowland Manifolds has made a great piece. One less troublesome component to help make your 20v carb conversion project that much more a painless process.

Now for some lunch...
Image


June 6, 2011
Carbing the 20 valve - Ignition control

For spark and ignition control I'll be using the following items:
  • x4 - Coil On Plugs from an Echo, Yaris,Prius...basically the 1NZF(X)E motor - I was able to procure a set of them for just $65. I'm sure there are even better deals out there.
    x1 - Megajolt Lite Jr programmable ignition unit by AUTOSPORTLABS - They're currently working on a Megajolt Lite Jr/C unit that will have on board drivers and allow for above 8,000 rpm as well as full sequential ignition. Keep a weather eye out for it y'all
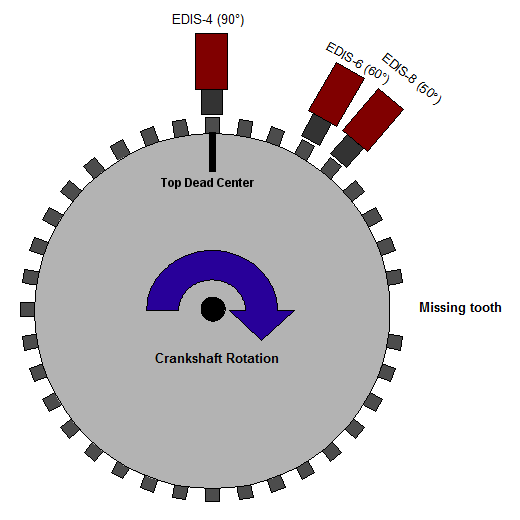
    x2 - Ford EDIS units
    x1 - VR Sensor (the pick-up usually located at the trigger wheel of the donor car)
    x1 - 36:1 Trigger wheel
I'm using the Coils from the 1NZF(X)E motor only because it's still Toyota and these in particular have the horizontal connector end rather than the upward, 45° protruding ends. These will be much easier to cover-up with the 20v spark plug wire valley cover (the Silvertop cover has been reported to be the ideal cover).

The great thing about the Megajolt Lite Jr. unit is that it has accommodations for controlling extra external components that require a simple on/off actuation at any designated rpm (as well as aux input data e.g. wide band readings, etc...). It's also very affordable and a deceptively simple unit. So given that information, it's perfect for energizing the VVT solenoid.

Why two EDIS modules? The following diagram should explain (the coils used in following illustration were from the 1MZFE and were only 2 wire coils - the +12v and ground are all that are required even with a 4 wire coil):
edis4_cop_2edismodules.jpg
edis4_cop_2edismodules.jpg (26.53 KiB) Viewed 335 times
This way, I can run the coils in a waste spark configuration (this is the exact setup I've been using on my 16v hi-comp) as well as maintain a 2 coil per EDIS module configuration which is the original duty each module saw in their original application. It may not be necessary but it keeps them as close to their original cycle and decreases the chance of pre-mature failure.

Decide on where you plan to mount your VR Sensor at TDC and by that align your trigger wheel with the sensor pointing directly at the 9th tooth (4 cylinder offset) CCW from the missing tooth. Here's a great illustration from AUTOSPORTLABS' installation guide:
Image


June 18, 2011
Carbing the 20 valve - Ignition control part II

Referring to the coils; as mentioned before they are coils from Toyota's 1NZF(X)E motor.

The portion of the coil fitted in the 20v spark plug "tube" is 115mm:
20v-carb-project_12.jpg
20v-carb-project_12.jpg (64.65 KiB) Viewed 336 times
The coil on the left is originally ~24mm in dia at the coil neck. The one on the right is ~23mm after taking it to the belt sander for a snug fit:
20v-carb-project_13.jpg
20v-carb-project_13.jpg (64.59 KiB) Viewed 336 times
20v-carb-project_14.jpg
20v-carb-project_14.jpg (48.5 KiB) Viewed 336 times
Sam of SQ Engineering has a great little mounting plate to keep these coils neatly secure:
20v-carb-project_15.jpg
20v-carb-project_15.jpg (55.84 KiB) Viewed 336 times
20v-carb-project_16.jpg
20v-carb-project_16.jpg (65.89 KiB) Viewed 336 times
Lovely work Sam!


August 27, 2011
Carbing the 20 Valve - Carburetors & mounting

I apologize for the infrequent updates but here's a quick one:
20v-carb-project_17.jpg
20v-carb-project_17.jpg (82.36 KiB) Viewed 336 times
I recently made spacers out of a green phenolic material I had laying around that I had randomly picked up a few years ago. I also cut out some gaskets out of grey sheets of gasket material (easily had from BAP * GEON or your favorite auto parts store).
20v-carb-project_18.jpg
20v-carb-project_18.jpg (78.25 KiB) Viewed 336 times
It's a clean shot of what you'll have to work with regarding the Rowland manifold. I'll be tapping the no.3 runner so I can mount the 2nd rod end that'll be part of the throttle shaft for the pair of linkage arms.
20v-carb-project_19.jpg
20v-carb-project_19.jpg (87 KiB) Viewed 336 times
Just one last shot of the mounted Solex/Mikuni 44 carbs:
20v-carb-project_21.jpg
20v-carb-project_21.jpg (65.41 KiB) Viewed 336 times

Here again soon...
Attachments
Edis_wheel.gif
Edis_wheel.gif (208.48 KiB) Viewed 335 times

mooreofit
VIP Member
Posts: 3694
Joined: Tue May 12, 2009 8:38 pm
Location: spring tx
Contact:

Re: Carbing the 20 valve

Post by mooreofit »

cool manifold. could have saved some dough though.

http://forums.vwvortex.com/showthread.p ... ting-parts" onclick="window.open(this.href);return false;
[img]http://i300.photobucket.com/albums/nn17/mooreofalan/attachment-2-1-1-1-1.jpg[/img]

3F05Q
Posts: 3
Joined: Mon May 23, 2011 6:36 pm

Re: Carbing the 20 valve

Post by 3F05Q »

Hey Dr. Occa, thanks for the heads-up for your post!

I have a couple of concerns, one of which you may/may not address and the other is an issue I may/may not have. :)

The head has a sort of "tri-oval" port shape to accomodate the injector spray, but the intake manifold does not have this same shape. Will you address the sudden step created by the shape difference, or is not your concern at this point?

The other issue involves the angle of the intake manifold... and how it may affect my swap. As far as I know, the motor mounts for the 4AGE>KP61 swap tilt the engine to be straight up/down rather than slightly slanted as it sits in an AE. Are you familiar with that? I'm concerned that this manifold may end up tilting the carbs downward. Thoughts?

Thanks again, and I look forward to following your progress!!

dr.occa
Hades - Site Admin
Posts: 7733
Joined: Tue Sep 04, 2007 1:49 pm
Location: On my hiney...in HOU
Contact:

Re: Carbing the 20 valve

Post by dr.occa »

3F05Q wrote:Hey Dr. Occa, thanks for the heads-up for your post!

I have a couple of concerns, one of which you may/may not address and the other is an issue I may/may not have. :)

The head has a sort of "tri-oval" port shape to accomodate the injector spray, but the intake manifold does not have this same shape. Will you address the sudden step created by the shape difference, or is not your concern at this point?

The other issue involves the angle of the intake manifold... and how it may affect my swap. As far as I know, the motor mounts for the 4AGE>KP61 swap tilt the engine to be straight up/down rather than slightly slanted as it sits in an AE. Are you familiar with that? I'm concerned that this manifold may end up tilting the carbs downward. Thoughts?

Thanks again, and I look forward to following your progress!!
Hey Alan, the "tri-oval" shaping of the intake port on the head shouldn't be a concern since the Rowland manifold essentially eliminates it from the initial entry from the manifold. If we turn the assembly (manifold and head) upside-down, the intake manifold basically forms a ramp "over" the injector cut-away or "ditch". I doubt the remaining depression will create any sort of turbulence of significance but the best way to determine this would be on a flow bench. Jeff (from Orion Engineering Motorwerks) has this graph illustrating the AE111 port activity:
Image
As you can see it's a VERY active port. The legend on the right indicates activity at those particular depths.

I'm sure applying the same test/study should supply us with some good answers.

As far as the motor's orientation in the Starlet bay, it could be solved by removing material from the exhaust side motor mount and shimming or adding a spacer to the intake side motor mount. Another option would be to create an intake shim of phenolic material cut out to the same shape of the Rowland Manifold and sandwiched between the manifold and 20 valve head. Something like the following illustration:
Image
my apologies if the drawing hurts the eyes :P
Take note of how the lower portion of the design is wider to help re-orient the carb side flanges.

Just ideas to get the creative juices flowing.

dr.occa
Hades - Site Admin
Posts: 7733
Joined: Tue Sep 04, 2007 1:49 pm
Location: On my hiney...in HOU
Contact:

Re: Carbing the 20 valve

Post by dr.occa »

Small update on the ignition portion of the first post.

I'm waiting on a few more things as well as an opening in my schedule...

User avatar
Kyo
Tourist
Posts: 70
Joined: Thu Nov 18, 2010 12:06 am
Location: Soap Lake, WA

Re: Carbing the 20 valve

Post by Kyo »

Very Cool, just what I have had in mind, I should really log on more often! (note to self buy another corolla lol)

I was very excited when I read Brent's Blog on the Megajolt/C (this will also help with my Miata goals )
any idea when it should be coming out?
Projects
House Remodel
Lotus Seven

dr.occa
Hades - Site Admin
Posts: 7733
Joined: Tue Sep 04, 2007 1:49 pm
Location: On my hiney...in HOU
Contact:

Re: Carbing the 20 valve

Post by dr.occa »

No updates on the Megajolt C that I know of outside of what's available on autosportlabs.org. Hopefully something new soon. More needed things should be arriving from the land of the rising sun for this project.

3F05Q
Posts: 3
Joined: Mon May 23, 2011 6:36 pm

Re: Carbing the 20 valve

Post by 3F05Q »

Any updates, good sir? I'm still very interested!

dr.occa
Hades - Site Admin
Posts: 7733
Joined: Tue Sep 04, 2007 1:49 pm
Location: On my hiney...in HOU
Contact:

Re: Carbing the 20 valve

Post by dr.occa »

Up dated the first post. I meant to update it back in August but forgot to and only updated the C4AG thread.

McKenney
VIP Member
Posts: 2244
Joined: Tue Feb 09, 2010 10:59 pm
Location: Richardson, TX

Re: Carbing the 20 valve

Post by McKenney »

Ya done yet?

dr.occa
Hades - Site Admin
Posts: 7733
Joined: Tue Sep 04, 2007 1:49 pm
Location: On my hiney...in HOU
Contact:

Re: Carbing the 20 valve

Post by dr.occa »

Not yet bud-usky. I have to finish the rot"isserie" coupe. I need to start pinching pennies. I sorry.

bt20v
Member
Posts: 1016
Joined: Sun Feb 28, 2010 11:44 am
Location: elbows deep in my 86

Re: Carbing the 20 valve

Post by bt20v »

how about now....
Being a toyotaphile is hard work

1987 GTS Coupe
1985 Toyota 4 Runner Locked and Lifted
1995 4 Runner(sold)
1991 Hilux(never should have sold)
1985 Hilux(wrecked)
1985 GTS Hatch(sold)
1985 SR5 Coupe(sold)

McKenney
VIP Member
Posts: 2244
Joined: Tue Feb 09, 2010 10:59 pm
Location: Richardson, TX

Re: Carbing the 20 valve

Post by McKenney »

what about now??

dr.occa
Hades - Site Admin
Posts: 7733
Joined: Tue Sep 04, 2007 1:49 pm
Location: On my hiney...in HOU
Contact:

Re: Carbing the 20 valve

Post by dr.occa »

Sorry, y'all. This is on hold due to finances. All that's really needed is just the coolant routing solution.

bt20v
Member
Posts: 1016
Joined: Sun Feb 28, 2010 11:44 am
Location: elbows deep in my 86

Re: Carbing the 20 valve

Post by bt20v »

ok so we can get some industrial garden hose and your set!!!! lol J/K I know im in the same boat with mine
Being a toyotaphile is hard work

1987 GTS Coupe
1985 Toyota 4 Runner Locked and Lifted
1995 4 Runner(sold)
1991 Hilux(never should have sold)
1985 Hilux(wrecked)
1985 GTS Hatch(sold)
1985 SR5 Coupe(sold)

Post Reply